 The points
There is a lost art in fifty-plus year old Honda maintenance. Ignition service. And it's necessary, even critical, that you know how to look after your ignition system. Let's start with the points.
Start by checking that the advance mechanismÆs cam when rotated snaps back quickly. The mechanism does not require lubing (because unlike the pushrod Brit versions HondaÆs is made of specially-hardened steel), but if grimy and/or rusty, cleaning and one or two drops of oil or a smidge of grease between the shaft and the cam is advisable. Check the appearance of the return springs alsoŚare they mangled, distorted, limp, rusty?
I also like to check the yellow and blue wires, and make sure they are tightened adequatelyŚI have the necessary teeny-tiny wrench, even.
Stock points are preferred. The aftermarket is full of substandard points. After dressing your points with a Flexstone (an old Snap-On tool now sold by pinball machine businesses) and then washing them with brake cleaner and polishing them with a business card, put a dab of point cam lube on the advancer camÆs high spot (yeah, the stuffÆs still available). Be sure to Flexstone and polish even new points, as they can come with lacquer or grease on them.
Carefully set both point gaps by visually finding the pointsÆs maximum opening, on each points set in turn, and adjusting the gap in that position. ItÆs much easier than it sounds, but if you are starting with a new set of points that you have just changed out you may find you need to artificially open the gaps very wide just to detect maximum point cam action. For the gap I like to use the small end of the range, but the manual says up to 0.016ö is okay. The reason Honda gives their 0.012"-0.016" range is so you can be comfortable with two points assemblies being one to four thou different from each other, which you will find is pretty much a given.
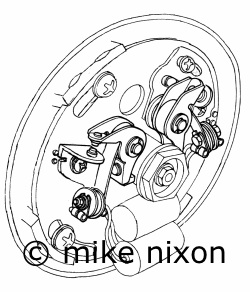
Loosen the backing plate screws. On the twins, position the plate just a bit to counterclockwise of center. On the SOHC fours, I rotate the plate almost fully counterclockwise and start there. I like to then lightly peen the crankcase to minimize slop at the plate. See the image above. Snug the screws.
Attach your deadlight to the left side points (and ground). Make your own deadlight from a speedo illumination bulb and socket and alligator clipsŚthatÆs the industry classic tool. (It's called a deadlight because it is not self-powered.)
Key on, kill switch on, rotate the crankshaft slowly and watch for the deadlight to light. (If already lighted, keep rotating until it goes out, then rotate more, slowly, until it lights again.) When it does, stop and view the timing marks. Whether advanced or retarded, you will then rotate the backing plate in the correct direction (opposite running direction advances, equal to running direction retards) until the light goes off, tighten the backing plate screws and recheck timing (back up the crankshaft slightly and then go forward again) because tightening the screws can throw it off a tad.
A word about screwdrivers. The backing plate is course held on with Phillips screws. Use the correct size, #2 on the fours, #3 on most of the twins. The points assemblies (and the sub-plate on the SOHC fours) are retained with strange-looking screws that appear to be a combination of Phillips and flat blade. But they are not. These are a Taiwanese spec that are really just flat blade screws. Do not use a Phillips screwdriver on them. And, the flat blade screwdriver you use must not be the one you pry things apart with. If necessary, and it usually is, on a grinder optimize the fit of the blade to those screws. I see way too many screw torn up badly. There is no excuse for that.
Once the left side points are good, move your deadlight to the right side points and repeat the procedure. See if the right side timing is correct. If not, on the SOHC fours, the sub-plate is adjusted to adjust timing, not the backing plate.
Of course, the singles and twins do not have a sub-plate under the right side points as the fours do. This means you have to view gap on these bikes as necessarily contributing to timing. So if you have got the left side correct and you go to the right side and find that to get timing correct you have to enlarge or reduce the gap to outside the Honda-recommended 0.12-0.16ö, this means you have to start all over again with a smaller or larger gap on the left side (but still within 0.012-0.16ö) so the right side will have the combination of gap and timing it requires. On the Hondas lacking the right side sub-plate, this is how it's done. The gap is adjusted on both sides in order to get the correct timing. On the fours, not so.
Don't forget to dynamically (strobe) time your ignition. One, you are checking your static timing work done earlier. And two, you need to ensure that the higher rpm timing is also correct. The full-advance ignition timing check requires over 2,000 rpm of the engine (typically 2,500 rpm). The strobe light will reveal double hash marks. Within those two marks is where the full-advance timing should fall after the idle timing is correctly on ōFö. Strobe check both left and right (1/4 and 2/3) points assemblies (by switching your strobelight's inductive pickup from the #4 plug wire to the #3 plug wire). If the full-advance timing comes short of the double hashmarks or overshoots the hashmarks, and the idle timing is correct (and your idle is the factory 900-1100 rpm) the advancer needs attention. If falling short, there is something wrong with the advancer's flyweights. If overshooting, the advancerÆs stop ears are probably slightly spread. Not uncommon. Honda twins of course will throw oil all around during dynamic timing. Honda sold special alternator covers with holes bored in them for this. If you donÆt have one of these you can make one. Alternately, you can also lean your bike away from the alternator side slightly while doing the tuning. Tricky, that.
Dwell
Of course you know that dwell is merely the dynamic equivalent of gap. Despite what you will read online, dwell is not a "secret sauce". Dwell can be an advantage, but not in the way most people think. It's far from mandatory. Having the two points gaps within 0.004ö of each other, with neither outside the factory range, as Honda approves, is enough. Having them exactly the same will not improve engine performance. Using a dwell meter simply speeds up the job by allowing gap and timing to be adjusted at the same time. And realize that every dwell meter is different, and Honda made almost no effort to advocate dwell. So familiarize yourself with your dwell meter by carefully setting points gap, then seeing what that reads on your meter on the running engine. Write it down somewhere and always use that number, whatever it is. Even put a piece of masking tape on the meter if that works for you. This is far easier than trying to figure out which degree number corresponds to your bike. Sure, Honda published dwell numbers, but half-heartedly and in an obscure and highly interprative manner. If dwell is your thing, all you have to do is find what your dwell meter calls any gap between 0.012 and 0.016ö and always use that.
The coils, wires and plugs
In addition to servicing and timing the points and related parts, you must not overlook the ignition coils, plug wires and plugs. These things deteriorate over time and come in for their own kind of neglect.
The ignition coils must not be cracked or evidence oozing a wax-type substance. Both indicate overheating, which is one of the faults of the Kettering ignition system. Also be aware that ignition coils gradually diminish in performance over decades of time and while not causing misfires or the like, you will find your bike responds to new replacements.
Make sure the primary wires--these are the black with white trace and the blue and yellow wires--are not loose or in danger of chafing or grounding.
The black/white wire is fed from a fuse after about 1975, so include this (or the main fuse in older Hondas) in your maintenance inspection. The keyswitch and the engine kill switch are also inline in the coil power feed. The horizontal keyswitches rarely give trouble, but the fork mounted vertical ones can give plenty of trouble. The kill switch is exposed to the elements so it can build up oxidation and waste voltage too. A volt drop test of all three is a good way to catch trouble before it catches you. Each should read zero volts, but more often than not you'll pick up a couple tenths of a volt due to the wire harness and the canon plugs being fifty or more years old. More than 0.25VDC spells trouble.
The plug wires are molded into the plastic coils in 70s Hondas. The wires are stainless steel core, so periodic replacement is not needed. The outer covering may stiffen and crack over time however, and that will be a reason to replace the coils. The plug caps are resistor type and should be unscrewed from the plug wires every so often and their resistance measured with a multimeter set to Ohms. Replace 70s plug caps when they exceed 5,000 (5K) ohms. Before reattaching the caps, nip off an eighth inch from the plug wires so the caps get a fresh "bite".
Spark plugs are a subject of opinion and controversy, and they really shouldn't be. Just know this. Abrasive blasting is not good practice. Cross-threading and overtightening are concerns. And putting in the wrong length plug can have dire consequences. Stay with original spec. If your bike's electrical system is well maintained, Honda ignition systems easily withstand increasing the plug gap a couple thousandths for potentially improved starting and acceleration.
|

 ®
®