|
The charging systems found on vintage Honda motorcycles require a completely different troubleshooting approach than do the very dissimilar integrated systems on cars. Moreover, the permanent magnet charging systems found on Honda's very early machines--most of them singles and twins--are unique even among motorcycles. To begin with, nearly all Honda powersports charging systems are modular, meaning their parts are placed at different points on the vehicle instead of being inside one central housing as they are in your Toyota. These parts are prone to fail in unique ways. For example, charging system stators, being simply lacquer-coated wire windings, bolted to the engine and thus exposed to intense engine heat, tend to fail a lot more often than they do in in other kinds of vehicles. They're part of the engine. Add to this all the wiring and connectors—themselves sources of trouble—and you can intuit that your diagnostic thinking needs to be different. Specialized testing is required. And that testing does not look very much like the tests your car mechanic might use. Or that of the electrical engineer who designs consumer electronics. It’s unfortunate but not surprising that you don’t find these special considerations in much of the troubleshooting advice found online. Or even in print, including from the factory.
How the system works
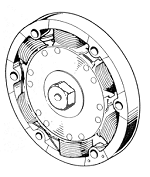
When the engine is running, the revolving permanent magnet rotor induces voltage in the stator which moves electrical current. The stator’s output goes through the rectifier to be converted from AC to DC—the AC produced by the revolving magnets’ two poles is not compatible with the battery. The battery is charged by this “rectified” (redirected) current. Since more engine rpm will unendingly produce more system output, the regulator waits for the presence of 14.5VDC at the battery indicating it is fully charged and defeats one of the stator's output lines, stopping charging and protecting the battery and the bike’s electrical components. That is until battery voltage drops below 14.5VDC again, at which point the regulator allows charging to resume. The regulator is constantly turning the system on and off. And on and off it actually is—there is no tapering in 60s-70s Honda permanent magnet charging systems. Permanent magnet charging control was very crude in those days.
Switches, wiring and connectors
Before troubleshooting look closely at the wiring and connectors. They are often overlooked, and they are responsible for at least eighty percent of the electrical problems on vintage Hondas, and in many cases 100 percent. Any connectors that show melting of their plastic housings (“canon plugs”) must be replaced. There are several good sources of these parts online, including the brass terminals inside them. A special tool is needed to disassemble canon plugs, available all over, but a good substitute can be made from a piece of hacksaw blade or feeler gauge. The terminals will inevitably be at least lightly corroded. Wire brush them, then smear a little soldering paste over the crimp, and using good electronic (60/40 ratio, rosin-core) solder, lightly and carefully solder the terminals to their wire. And don’t overlook the mainfuse holder or fusebox. Again, visually inspect, de-corrode, and solder.
Regulator
There are five common issues with vintage Honda permanent magnet charging systems. The first is the regulator. The three-wire (black, yellow, green) type fails with no warning, resulting in reduced charge. But it is easiest of all regulator types to test. Simply unplug the black voltage-sensing wire (actually, any one of the three wires) and test charging in that condition. This is called a regulator bypass. If charge increases dramatically, the regulator is the problem. Later model permanent magnet Honda charging systems such as on the V-4s and V-twin cruisers hide this wire so different method must be used to bypass the regulator.
Rectifier
Next is the rectifier. The early Honda twins used a bristly metal french fry cutter-looking thing painted orange. Even when it is working perfectly, its ancient selenium construction aborbs an excessive amount of energy. And when it eventually fails completely it will either block current or bleed backward and waste current. Replace it with a more modern silicon type regulator available from a number of sources and you will instantly gain a charging improvement. Honda themselves offered this upgrade back in the day.
Keyswitch
The third issue that can come up is that certain models of keyswitches build up resistance internally at their contacts. When this happens, the permanent magnet charging system will overcharge. This is because the keyswitch is part of the charging system: it is in the circuit that tells the regulator how fully charged the battery is. Poor keyswitch contacts send a low-voltage message, and the regulator in response goes full-tilt. Overcharge, in other words. This keyswitch problem is mostly found on the models having the vertically-mounted switches, which are much less durable and do not hold up as well as the earlier horizontally-mounted ones.
Overloading
The fourth problem on vintage Honda twins is when a non-original headlight or ignition coil is fittted. Most of these bikes have very low wattage headlights for a reason. Any increase in the headlight wattage will affect charging. The same for an aftermarket ignition coil. A coil whose primary resistance is less than 2.2 ohms will impose so much of an electrical load that it will significantly reduce charging to the battery. If replacing your ignition coil, be sure to use one with 2.2 ohms primary resistance or more and you will be fine.
Rotor
Problem number five is a weak alternator rotating magnet (rotor). The most common reason is when one accidentally installs the battery backward in the bike. This can demagnetise the rotor, and this very scenario is in fact the subject of an official Honda service bulletin. Alternator rotors can also lose magnetism in other ways, including excess heat and mechanical impact.
Testing the battery
After the wiring and connectors inspection and consideration for known issues, it is imperative to charge and load-test the battery. The battery affects the charging system in ways that are not intuitive. It can also be failing completely on its own. Charge the battery with a battery charger having at least a 2-amp output. “Tenders” or trickle chargers are not adequate for this. Determine the sufficient charge state of a flooded cell battery by measuring its specific gravity. It should be 1.280 or higher. On sealed batteries, measure open terminal voltage instead. "Open" means nothing connected. No matter the battery type, follow with a load test. Use a 100W, 2 ohm wire-wound test resistor with its movable lug set in the middle. Jumper this lug and one of the outer ones while at the same time having a multimeter connected to read 12VDC or more, to the battery. At the end of a 15-second countdown, the battery, whatever type, should retain a minimum of 10.5v. If any of these tests fail, the battery should be re-charged and retested, and if it fails again, it needs to be replaced.
Part 2
Further reading:
Charging system types
Motorcycle charging system evolution
Permanent magnet system regulators
Electromagnet charging systems
The CBX1000 charging system
|

 ®
®