  ® ®
|
More than you wanted to know about the 1981-1982 CBX Pro-Link shock |
|
|
The CBX shock does its job. It helps to remember it is a mass-produced item, having a careful balance between economics and sophistication. When everything is taken into account, like everything Honda made, that Pro-Link shock got by surprisingly well.
But the design is 1950s-tech. Until the early 1980s, street bikes weren’t suspended all that well. Most shocks in those days were filled with damping oil and sealed. To allow room for the shock’s shaft to enter the sealed tube, an air pocket was left above the oil. The oil level could rise inside the tube and didn't hydraulically lock. This oil and air inevitably mixed, producing a froth, and this affected how consistent the shock’s damping was, which is to say, not very. Interestingly, this type of shock is called an “emulsion” design. It operates on bubbles, literally. It's still around today, but it's pretty old-school.
One way manufacturers mitigated this deficiency in the emulsion design was to put the shock’s tube inside a second tube, so there were inner and outer chambers. This distanced the air pocket from the inner damping tube, plus added volume to the oil so that it took on air more slowly. But it still emulsified. This advancement was labeled the “dual-tube” shock.
The real solution however was to segregate the oil and the air. The mandatory air pocket was sealed off from the oil using either a bladder or a movable seal. The oil still rose inside the tube, but against this diaphragm, and the air could not mix with it. No more emulsion, and much more consistent damping. This was called the “DeCarbon” design, after the European who invented it, and production off-road motorcycles were the first to use this shock, beginning in the late 1960s. Production street bikes would not have DeCarbon shocks for decades afterward however.
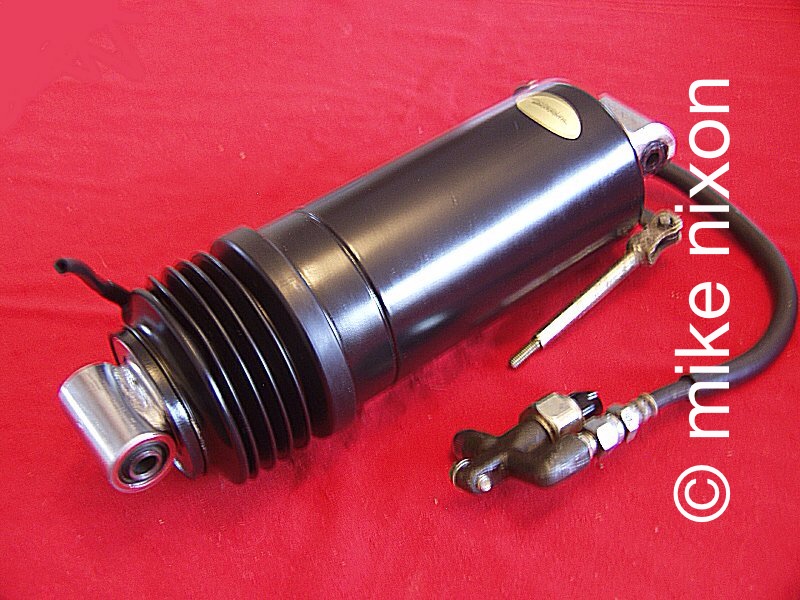
The 1980s Showa-made Honda Pro-Link street bike shock is the older emulsion design, and it has not two tubes but actually three—a tube within a tube within a tube. But it’s still emulsion. This means it is, for all the massiveness of its appearance and its presence on some really significant and remarkable motorcycles, not a great shock absorber. Adequate on a good day.
If that were all, things would have been pretty good. But you just know it gets worse. Unfortunately, Showa did a couple things when making this shock that sadly reduced its effectiveness, making it even worse than it already was. The first problem is the chrome-plated outer tube, the surface that the shock’s main seal rides on. This tube, bearing all the shock’s internal pressure and bolstered only by a thin chrome plating, is susceptible to deterioration, and even more so because it is exposed to the elements, even close to the roadway, and thus subject to debris and moisture, with the accordian boot the tube’s sole defense, and not a particularly good one. Second, and far more egregious, Honda’s (Showa's) CBX shock was not assembled correctly during production. History, documentation, observation and experience have all proven that the amount of oil put into the shock was half what it should have been. The problem with this isn’t the oil per se, it’s the air above the oil. The shock has too large an air volume. In the emulsion design, the air above the oil compresses as the shock contracts, and the pressure builds to a point that supplements the coil sping. That's part of the design. Unfortunately, in the CBX Pro-Link shock, the increase in pressure never gets there. The oversized air pocket makes the air “lazy” and the shock too soft on “full bump”, resulting in bottoming. This encourages riders to exceed the factory maximum of 57 psi, leading to poor action and accelerated wear of the chromed tube.
And, in addition to these things, the shock was not made to be rebuildable. Two of the shock’s three tubes are welded together at the top. The most the factory intended was removal of the seal and replacement of the damping oil, which in the best practice are exactly the same operation. This is best termed a “refresh” and not a rebuild, though simply putting in new hydraulic fluid and using more than the shock had originally does improve it considerably. However, complicating things somewhat and not well known is Honda’s apparent indecision on the proper way to do the relatively simple task of seal replacement. Though their shocks differ only dimensionally, you can find at least two very different procedures between the CBX manual and the manuals for the GL500/650, VF750S, and VF1100S and Turbo, and a third, very different method was taught in Honda factory training school and supported by little-known but then-available factory special tools.
I became immersed in the emulsion Pro-Link shock at the very beginning. I bought all the factory tools, and with a long tenure in Honda dealerships I was exposed to a lot of these shocks. I began experimenting with them, cutting the welds apart, extracting the damper tubes, and tweaking things. Though I enjoyed some successes, I concluded that internally they are best left alone. They are just too flimsy inside. Even the shock's valving is stamped metal. Nor is any internal work such as this supported by factory replacement parts. Not even the o-ring sealing the top of the outer cannister has a part number.
If your shock is working okay, then leave it alone. If however the shock keeps losing air pressure, or you find oil at the tiny tell-tale hose at the bottom of the accordian boot, then it needs service. The best solution really is to look to an aftermarket shock. If however for whatever reason you choose to stay with the stock shock, here is what you need to do.
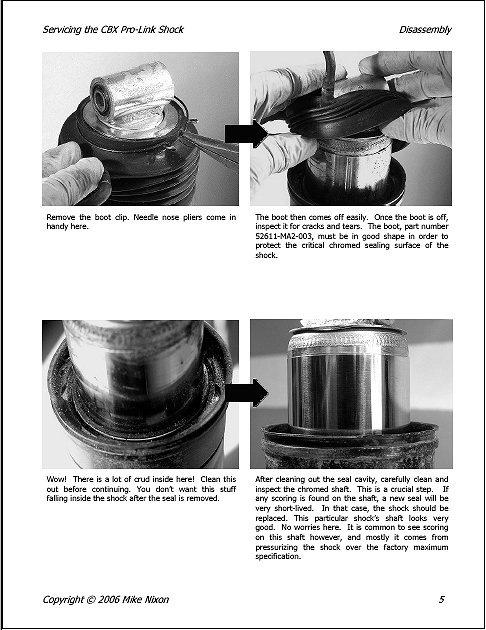
1. Inspect the chromed shaft. Peel back the accordian boot as much as possible and get a good look. Dings, peeling chrome, and rust will keep a new seal from sealing. Even if the only thing wrong is a torn boot, that is itself a problem. The boot is long discontinued.
2. If the shock passes this test, remove it from the bike and do the shake test. Shake it like a spray paint can, up and down, hard. If you hear a sound like pebbles inside, this is the shock’s internal plastic bump stop having, through interaction with the damping fluid, disintegrated into a myriad of pieces. This is fairly common, and it also disqualifies this shock for refreshing as it is impossible to get all the plastic fragments out without cutting the shock apart.
3. If replacing the seal yourself, realize that any method of getting the new seal installed that involves a hammer will destroy the shock by buckling its outer case. It’s a very thin piece of metal and a very careful process using the correct tools is non-negotiable here. Beware of the ad-hoc procedures promoted online. Unfortunately, this late in the game the specialized factory tools are obsolete and thus need to be home-replicated. New seals are available on the front page of my website.
4. If the only complaint is bottoming, you are fortunate and the solution is simple. You don't even need to remove the shock from the bike. But don't add air, add oil. Rather than going over the recommended 57 psi, add oil to the shock in 25cc steps, through the air fill hose, using a syringe. After each 25cc, test ride. Add more if necessary, up to an added maximum of 200cc.
5. Don’t overlook the linkage and its bearings. They need greasing with moly grease—Honda has their own. There are also aftermarket sources for the bushings. It makes a lot of difference in rear suspension smoothness.
The refresh? I removed the seal per the factory school method, drained the shock, and inspected everything. I then put the shock in a hydraulic press and tested the piston shaft for bend by working the shock up and down. After replacing all the o-rings I refilled the shock and installed the new seal, then tested it for leaks by pressurizing it and leaving the gauge attached to the hose overnight. In some cases I also removed the outer case and removed the spring (what a job--dangerous and requiring even more specially-made tools!) and shimmed the spring to reduce the shock’s dependency on air pressure—a good thing to do, especially for a heavyweight rider.
So there you go. Unless you just have to keep the shock original, replace it with a quality shock. I welcome questions. Website: www.motorcycleproject.com. Email link below.
|
|
||
|
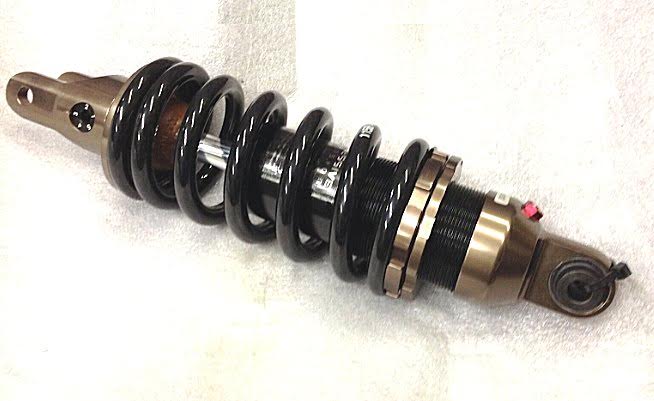
This is the Progressive Suspension company's quality shock for the 1981-1982 Honda CBX1000 Pro-Link model. In recent years it has been discontinued. Look for the Hagon brand instead. |
||
|
|
|
|
I sell a how-to booklet on the CBX Pro-Link shock. Click on the picture on the left to go there, and here to go to my whole catalog of how-to books.
|
||
|
Last updated December 2025 Email me www.motorcycleproject.com My bio © 1996-2025 Mike Nixon |