|
Why an ammeter?
It's okay. It really is, that you are confused about ammeters. Most people are. "How is an ammeter different from a voltmeter", you ask. You might think they're the same thing. You may not have even heard of an ammeter before. But it happens to be the best information-providing instrument you can have on a vintage Honda.
What are amps?
Electricity has three important characteristics: pressure, flow, and resistance to flow. Pressure is called voltage, flow is called amps, and resistance is called ohms. When we monitor amps then, using an ammeter, we are monitoring electrical flow. And although voltage can be useful, when it comes to a charging system, flow is much more important than pressure. An ammeter therefore is a really handy thing to have.
Dynamic, not static
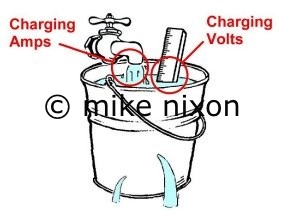
In automobiles' early days, cars had ammeters as standard equipment, as did many motorcycles also. Later, electrical systems were considered more reliable and the ammeter disappeared. Often, it was replaced by the voltmeter. However, an ammeter is a better charging system monitor because as mentioned previously, flow--amps--is active, responsive electricity, whereas pressure--volts--is merely static, accumulated electricity. One shows real time activity, the other the product of activity. The difference is exactly the same as the difference between the rate of flow into the bucket (amps) versus the level of water in the bucket (volts).
Push and pull
Your bike's battery is an electricity storage device as much as it is an electricity-producing device. Consequently, two things are happening to it all the time: it is giving out electricity and it is taking in electricity. And like your bank balance, the idea of the motorcycle's battery and charging system is that the battery will, though both output and input happen simultaneously, receive more than it puts out. Right? How else could it survive? For this to happen the battery must receive compensation for each bit of energy it serves up, which of course is what the charging system is for. The ammeter is literally a monitor of this compensation. It is therefore supremely suited to informing in real time everything that happens with the charging system.
The busy needle
Some people are confused by the ammeter's needle moving around so much. But it wiggles because battery charge and discharge constantly change places. As the bike is cruised, the back-and-forth swing of the needle will gradually decrease, and soon the swing from low amps to high amps will be minimal, the needle almost completely still, indicating that the load pulling on the battery is equal to the push going into the battery due to the bike through riding having fully refreshened the battery's charge. The ammeter's needle will hover around 0. Then, at a stoplight the needle will, due to the engine's very low idle speed, momentarily dip below 0, and then accelerating from the light, the needle will swing an equal amount above 0, and as the vehicle moves this swing will again gradually lessen, until it quivers around the 0 point as before. That's all there is to it.
Ebb and flow
Once you have spent some time with an ammeter, you will intuitively find it faithfully represents the interplay between battery and alternator, offering a moment-by-moment picture of the health of the charging system. You will probably be surprised that the battery loses so much charge upon starting the vehicle, and equally amazed that the bike replenishes that lost energy so quickly as you ride off. Each load, as it is introduced and then compensated for, will display on the meter. The turnsignals, for example, will cause the ammeter needle to dip in time with the flashes. The brake light also will show as a dip of the ammeter's needle. Turn on the headlight, same thing. The instrument is very sensitive and, well, busy.
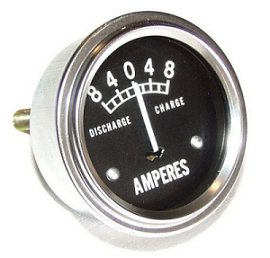
Choosing the ammeter
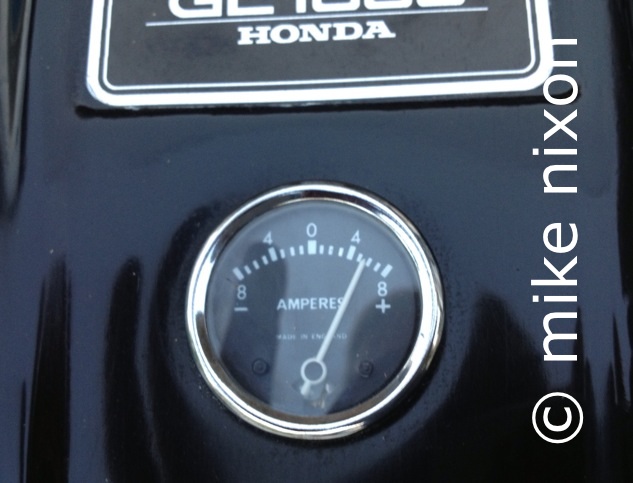
First, pick an ammeter that has a small range, no more than 10 amps. One with an 8 amp capacity is even better. Most vintage Hondas don't charge over that figure, ever. An ammeter that reads to 20 or 30 amps or more is not going to be as visual. Its needle just isn't going to move much. Because of the huge pushrod Brit bike community, there are a lot of appropriately scaled choices in ammeters today. Few are backlit however, which led me to choose one marketed as an OEM equivalent for the India-produced Royal Enfield Bullet. This one is backlit. I've run this one for several years now on my 70s Honda four.
Installing the ammeter
Make the opening in the headlight shell or fairing with a hole saw. It will make the cleanest hole. Panel mount meters have very small bezels and so won't hide a sloppily cut hole very well. These meters have brackets which tighten the meter against the inside of a fairing. I don't have a fairing on my bike so I found an appropriately-sized aluminum aerosol can (from some kind of beauty product my wife bought, I think...) and cut a length from it to house my ammeter.
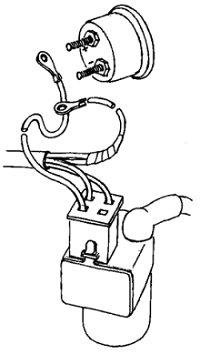
Wiring the ammeter
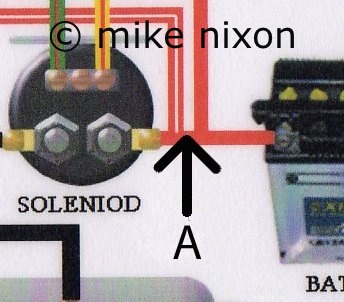
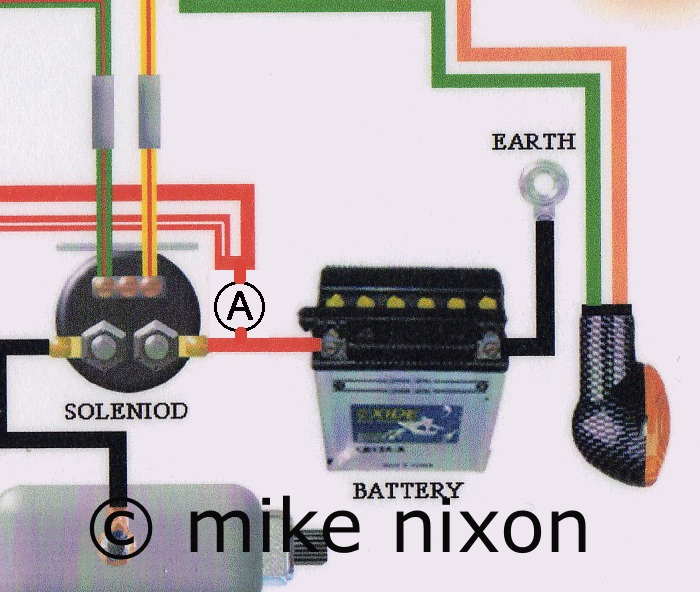
To wire your ammeter, find the most two-way, current-rich spot on the bike. On a Honda that is precisely the splice Honda made between the charging system's red/white wire and red wire pigtail from the rectifier and the red wire at the battery. This splice has to be separated and the ammeter put in-between. DO NOT wire the ammeter into either battery cable. The starter motor's 80 amps will "do in" your poor little 10-amp ammeter. Use 14-gauge or heavier stranded copper wire. The ammeter is going to be far from its electrical connection point. Its wiring will therefore be long, and extra thickness will prevent it from absorbing too much energy and causing voltage drops. Route the wiring carefully. You don't want to pinch this wire in a fork stop. Wrap it with that curly plastic sheathing stuff for extra insurance. Remember to solder on the eyelets and solder and shrink tube everything.
|

 ®
®