  ® ®
|
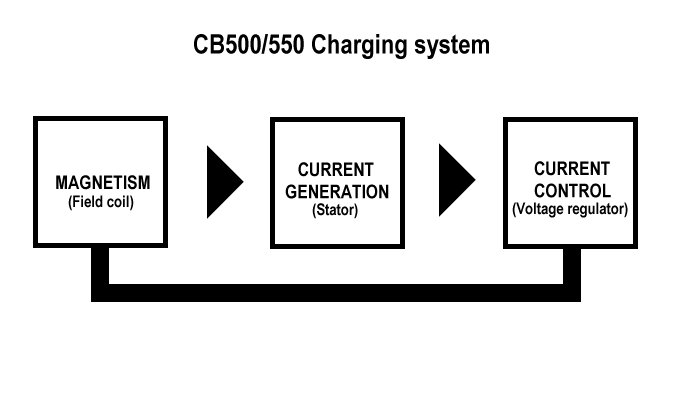
The CB500/550 charging system |
|
|
Take a coil of copper wire and pass a strong magnet back and forth over it. A meter attached to the coil will register the presence of electricity. This is the beginning of a motorcycle's charging system, and the real thing gets very little more complicated than this, believe it or not, with most of that complexity being found in compatibility and control components, not in the major pieces.
The vintage sohc four Honda charging system is unique among today's powersports systems in that the magnet is an electromagnet. The electromagnet is a kind of volume control whose magnetism is turned down at high engine rpm to protect the battery. This turning down function is handled by the voltage regulator. The system is fairly high output, at least by the standard of the Honda twin-cylinder bikes which made up most of Honda's lineup when their four-cylinder bikes emerged.
The system is robust as well. Very durable. Practically the only thing that gums up the works is the inevitable corrosion and general deterioration of the dozens of wire connectors due to their being the old-school exposed back type. This is the area that should get most of your attention. Of course, replacing major parts with Chinese substitutes will screw things up too, but you wouldn't do that, right? Or put a ton of driving lights on the bike? Or cut down your reluctor to save weight (expect half an amp to an amp reduction in charge)?
You also do not want to use Walmart batteries in these bikes. Seems as if a lot of folks do, however.
Go over all the connectors. Connector rebuild parts are available all over, including from Honda themselves. At the stator connections, clean, prep, and solder the terminals to their wires. (Not the wires to each other.) Reconnect slathered with grease (not lithium). Consider the benefit of replacing the entire wiring harness, as many are doing today. In many cases on these bikes, a new wiring harness performs miracles. Inspect the regulator's vibrating points and adjust their spring tension to maximize magnetism and thus output.
Troubleshooting this system is very easy. Problems arise through assumptiom, misinfomation, and unfamiliarity. Assumption in terms of almost everyone thinking quick fixes are how it's done. From more than 50 years of observation I have concluded this is where most folks go wrong. Misinformation because the way you have doubtless heard of diagnosing this system, wherever you heard it--and most definitely that on forums such as sohc4.net--is false and is not used by career mechanics. And indeed, even the factory manual's method is unhelpful. And unfamiliarity in that no matter how sincere you are, that won't make up for electrical incompetence. If not completely comfortable with electricity, find a professional. Here in a nutshell is the method I endorse in my SOHC Charging how-to booklet, and frequently email to folks. This method is specific to the CB500/550.
Visually inspect all connectors paying special attention to the highest-current ones: the alternator, the rectifier, and the solenoid connections. Any discoloration let alone signs of melting, should be repaired by extracting the terminals (requires a special tool) and cleaning and soldering the wire-to-terminal junctions, then reassembling the connectors. The brass terminals and the plastic connector housings are available from several sources, including Honda themselves (and always have been).
Adjust the electrolyte level of a flooded cell type battery, and whether sealed (AGM or Gel) or flooded, charge the battery with a charger capable of at least 3 amps. This is not a trickle or "maintenance" or "tender" charger, note. On the flooded cell battery, do a specific gravity test (look for 1.265). On the sealed battery do an open-circuit terminal volts test instead (look for 13VDC). If need be, recharge and retest. If the above standards can't be met, replace the battery, regardless of how new, where it came from, what it cost, what your brother-in-law says, etc. Don't screw around.
Load test the battery using a 2 Ohm, 100 Watt power resistor such as that available from Allied Electronics. Keep your multimeter set to 12VDC on the battery during the test, and after 15 seconds of the resistor adjusted to the middle position, the voltage should not go below 10VDC. If it does, charge the battery and retest. If it still goes below 10V, replace the battery. No matter what.
Get a quality digital multimeter, such as the GTC CM100, that can read high current inductively. The GTC CM100 is the best multimeter you can buy for motorcycle work. It has no peer. There is no other clamp type multimeter anywhere that has the current capability, both high and low, and in ranges that are suitable for motorcycle application, and with a convenient inductive clamp, that this one has. Read the directions in regard to "zeroing" the inductive pickup. Clamp the meter set to high amps on the battery negative cable. Turn the keyswitch on but do not start the bike, and note whether the meter is reading positive or negative current. It should be negative. If it is positive, reverse the clamp orientation. Start and warm up the bike so it will idle unassisted. Let it idle for one or two minutes. Then quickly but smoothly rev to 5,000 rpm and hold at that rpm for only 1 second--no more--and let go. During that second, note what the digital multimeter readout says. A healthy CB500/550 charging system will show above 3 amps.
If considerably less, bypass the voltage regulator by putting a jumper wire across the regulator terminals that have a black wire and a white wire attached. Keep the harness wires attached. Then repeat the current test but this time rev to only 2,000 rpm to protect the lights. If the charge rate increases significantly, there is an issue with the regulator. Adjust, repair, or replace.
If the regulator bypass makes no difference, un-bypass the regulator and dangle a feeler gauge or large paperclip on a pencil close to the alternator and turn the keyswitch on and off slowly, a couple of times. Don't start the bike. Each time the keyswitch is turned on, the feeler gauge should kiss the alternator cover, and each time the keyswitch is turned off, the feeler gauge should dangle unaffected. This is a magnetism test.
If this does not happen, set your multimeter up for 12VDC and do a volt drop test from the battery positive terminal to the alternator field coil wire, still connected and keyswitch on for the test. The reading must be under 1 volt. If more, move the positive meter probe away from the battery terminal and toward the other probe, step by step, at each available connector, until the reading decreases dramatically. The last juncture tested will be where the problem is, usually a bad connector. Repair the connector.
If on the other hand the magnetism test showed good, then disconnect the alternator connector and using a terminal tool extract the three yellow wires on the alternator side of the connector, and reconnect the connector. Now jumper your 2 Ohm test resistor at its extreme lugs to two of those loose alternator's yellow wires, loading it, and attach your multimeter set for 25-50VAC to the same wires, and start and rev the engine to 5,000 rpm. The reading should be 18 volts minimum. Repeat two more times with new combinations of the three wires, looking for the same result within about 10 percent.
If your readings from this test are bad, then the alternator stator is bad. Replace it. If the readings from this test are good, then the rectifier is bad. Replace it. I strongly recommend against Chinese replacements. Instead, find a good used factory part, which is how you should approach all electrical parts replacements on vintage Honda sohc fours.
After making the indicated repairs, repeat the charge current test, step #4. It is important to confirm the repair and to catch any lingering issues (i.e. more than one problem).
|
|
Note some important things about this method. First, note that it flows like a flowchart. That is, it is based on a "if this then this" logic structure. You don't do the test following an earlier test unless indicated by the results. To do that makes no sense. In fact, if you are going to jump around and do the tests in a different way or in a different order or with skipping some, or by combining this method with parts of another method, do not contact me. I can help you only if you are willing to take advice. Second, note that all these steps are dynamic, that is, made while the charging system is actually operating. No static tests in other words, which means no resistance tests. Professionals, i.e. those who make their living in the industry, rarely rely on resistance tests. For good reason. Lastly, you must use the equipment described. You must have a good multimeter, and I strongly recommend the GTC CM100 because it is the easiest way to read charging current. And you must have the test resistor and use it properly.
If I come across a bit strident in tone here, it is because I am weary of pushing back against all the misinformation that passes for advice in the Internet swamp, particularly that on sohc4.net (whose "experts" insist a quartz headlight, Dyna ignition, or 2-ohm coils will kill your battery--it just isn't so). Just because a forum poster has an electrical engineering degree does not necessarily mean they understand vintage Honda electrical function. In fact, such an individual invariably disregards the vast difference between theory and practice, and this oversight is never more obvious and more harmful than in motorcycle electrical troubleshooting.
|
Email me
© 1996-2024 Mike Nixon