  ® ®
|
Building and Using a Cylinder Leakdown Tester
|
What Kind of Test?
Everyone remembers how to do a compression test: Screw in the
tester, flip the kill switch to "off", hold the throttle wide
open, and press the starter button. The cylinder takes in air
and compresses it, and the tester traps it. The maximum is
reached when the gauge holds more pressure than the engine can
produce. Not too difficult. The weakness of this test however is that throttle postion, engine temperature, ambient air temperature, and a host of other factors can make the results vary considerably. What's worse,
a compression test checks too many engine components at the same
time. A poor reading can indicate so many things, it's hard to
tell which engine part is at fault without doing a lot of other
tests. A leakdown test avoids this difficulty. Air is pumped
into the cylinder from an outside source, and the gauge reads
the percentage that escapes, which not only eliminates all of
the afore-mentioned variables, but as a bonus, makes it a simple
matter to pinpoint the source of the leakage by wiggling and rotating
engine parts while the test is underway.
"That'll be $1,500, and Oh, Uhh...it Still Smokes..."
But how does it work? Okay. Let's say your brother-in-law rebuilt your engine. You've suspected that the guy is
mechanically-challenged, and sure enough, the finished product
smokes like a chimney. But he's your kin, so... Finally, you
have a shop look at it. Good results from a compression test combined with
the smoking leads them to a diagnosis of trashed valve guides.
Seems reasonable and you approve the work. But, the engine still
smokes. Now you really have a problem, not to mention the shop,
and your brother-in-law. Enter Mr. Goodwrench, who produces a
leakdown tester, and performs the following test. On each cylinder
in turn, he finds TDCC, sets up the tester, and reads the percentage of
leakage. They're all good and low. Hmm. Undaunted, our hero
retests each cylinder, but this time he lowers the pressure setting
on the instrument, and, rotating the crankshaft a smidge
each time to slide the piston down the bore a little, picks up
the problem, plain as day. On the #4 cylinder, the gauge now
reads 60% leakdown when the piston is partway down the bore,
indicating cylinder damage, which the teardown verifies. Seems
your brother-in-law didn't get one of those pesky wristpin circlips
all the way into its groove. It subsequently popped out,
and the wristpin tore a handsome trench into the cylinder wall.
Why didn't the shop find it when the head was pulled for the
valve job? Because two of the four pistons were at TDC. Why
didn't the compression test pick it up? Because despite the
trench, there was still plenty of cylinder area (the pin is more
than an inch below the deck) in which to build adequate pressure
during a compression test. This actually happened, and it illustrates both the weakness of a compression test and the comparitive strength of a leakdown test.
Whoosh!
Leakdown testers are way cool. Not only does the amount of air
escaping from the cylinder register on the gauge, it can also be
heard, enabling the source of the leak to be pinpointed prior
to the teardown. For example, high readings accompanied by hissing
in the carburetor indicate burnt, tight, or carboned-up
intake valves. The same thing in a muffler points toward--you
guessed it -- exhaust valves. A breeze coming out of the dipstick
hole indicates worn or heat-softened rings. And, air escaping from an adjacent spark plug hole pinpoints a blown head gasket.
Not for Everyone
There's a catch, of course. You need an air compressor to use
a cylinder leakdown tester. And, you need to now how to accurately
find TDCC (top dead center on the compression stroke) for each cylinder
that is tested. Can you do it? Sure. If you can correctly
adjust your valves, you can use a leakdown tester.
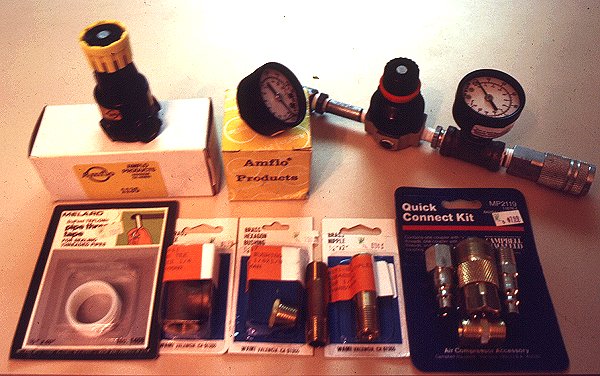
Rolling Your Own
Inexpensive, ready-made leakdown testers are easy to find today -- you don'thave to mortgage your house to a Snap-On dealer. So, if you are concerned about the condition of your engine but aren't into making things, or don't have the time, you can buy a leakdown tester for about $75 at many auto parts stores and the like. If on the other hand you have an air compressor, that sort of implies that you're a certified tinker. You're probably also into making things, and for you, throwing this thing together is no big deal. For you then, here's the
rundown:
|
|
Pressure regulator
|
This is designed to be screwed onto an automotive paint spray gun. Grainger's is probably the cheapest, followed by Sears and Ace Hardware. The gauge that is often attached is, unfortunately, the wrong kind for our purposes. Also, make sure it comes with the block-off plugs for the two passages that you won't be using.
|
|
Pressure gauge
|
Get a quality, back-mount, 0-100 psi gauge. As of this writing Grainger has the best deal. For the professional touch, carefully pry off the bezel and cover the faceplate with a copy of the label shown here. If you don't re-label the gauge, no big deal. Just read it backwards; i.e. "10" means 90% leakdown.
|
|
Spark plug adapter
|
Make this by clamping an old spark plug in a vise (protected with wood or aluminum stock, of course, and on the hex--not the threads)and whacking off the porcelain with a well-aimed lateral hammer blow. Then grind off the rolled-over seal above the hex, grind off the ground electrode, put the plug back in the vise and drive out the remaining porcelain with a drift (if difficult, the rolled seam hasn't been sufficiently removed--on some plugs you must grind partway into the hex). Tap the hex end with a 1/4" pipe tap (NGKs are hardest to tap but seal the best afterward). Screw the bugger onto a 1/4" to 1/8" pipe reducer, and that onto a 12" grease gun hose (about $5 at Wal Mart and just about anywhere).
|
|
Damper valve
|
This essential part is merely a restriction
between the regulator and the gauge. The easiest way to make it is to plug the middle pipe with epoxy and afterward drill a 0.040" (#60 or 1mm drillbit) hole.
|
Using It
Adjust the cylinder to be tested to TDC compression (all modern inline fours' firing orders are 1-2-4-3). Plug your tester into an air compressor line and adjust the regulator to get a "0" (or 100 psi, if you didn't customize the face) reading. Screw the
hose into the spark plug hole. Connect the two. If the crankshaft turns or you hear all the compressor's air rushing out of an obviously open valve, the cylinder wasn't set exactly on TDC
compression. Try again. When you get it right, the piston will stay put and the tool will indicate the amount of air that is escaping from around the rings, valves and head gasket of that cylinder. All cylinders leak a little. Large ones leak more, smaller ones less. Racing cylinders lose only 1 to 2%. Production multicylinder engines in top fiddle pass 5% and less, and no more than 10% regardless of the mileage. More than 10%
leakdown means there's something wrong. If the leakage is slight, and you suspect a valve, warm up and calibrate an exhaust gas analyzer (EGA) and set it up in the appropriate exhaust pipe. Then disconnect the tester from the hose a moment, squirt some carburetor cleaner into the cylinder through the test hose, and reconnect the tester. The hydrocarbons (HC) will go off the scale, indicating the exhaust valve. If not, move the EGA probe to the airbox and repeat the procedure, and on to the crankcase vent (or oil fill hole) if that seems warranted.
Big Bore Engines
You may need a helper if the engine you're testing is a big bore single or twin. First, there won't be enough friction in the engine to resist the compressed air, even at exact TDC. You have to either find a way to clamp the engine at TDC compression, or get someone to hold it there for you while you do the test. Also, for cylinders over 100mm in diameter, allow a bit more leakdown, up to 15%, before condemning it.
Yowie!
In the event of a high reading, first take the time to double-check that you are in fact at TDC on the compression stroke, not on the exhaust stroke (where both valves will be open). If that checks out, and the leak is (as it is usually) a valve, remove the valve cover and, with a hammer and drift, carefully tap on the valve followers for that cylinder, watching the gauge as you do so. This will often loosen carbon from around the
valve and the reading will drop to a reasonable level. If not, well, time to get it fixed.
Parts List
Miniature air pressure regulator
0-100 psi gauge, back-mount, metal case, removable bezel
12" grease gun hose
1/4" NPT quick disconnect fittings
1/4" plumbing pipe and "T" joint
1/4" to 1/8" NPT reducers (2)
Old spark plug
Teflon plumber's tape
|
|
Go here for background information on how this article came to be written. Enjoy!
Last updated December 2021
Email me
© 1996-2021 Mike Nixon
|